Sunday, February 24, 2019

living life large, and other lessons i have learned

Hard to believe that in just 4 short months it will have been 4 years since I posted here! Time flies when you are living life large. Ok, not so large maybe. But I am 4 years closer to retirement, which looms just a couple years away. And in the past 4 years I have had lots of trips, happiness, sadness, and all the little things that fill up a day and make the years rush past.

I have also come a long way in my thinking about art since the last post. There was a long spell, several of them actually, when I wasn’t interested in art much. Just kind of meh about drawing or painting. I’ve done some digital art, and see a lot of potential in being able to make adjustments as I go on a piece. It is a fascinating medium to work in, and the amazing art you see on the internet created with digital art apps is fascinating. I spent more time with that the past several years than anything. Dabbled in watercolor and acrylic a bit, but more just messing around than doing anything serious.

Lately though, I have been thinking more and more about watercolor. It has always intimidated me, and I admire anyone who can control wet colors on a surface that do their own thing. I watched a lot of YouTube. And learned a lot as I watched. I decided to give watercolor a serious try. Serious about learning something for me means education. Lessons. Books. Online classes.

I signed up over the past few weeks for several online instruction courses. The first was paying to follow videos published by very versatile and talented artist Kirsten Partridge. You can see some of her work here: https://youtu.be/eEXfQKabQGI . For me, it gave me some insight into skill, materials, and the time involved to paint seriously.

Second, I enrolled in two different types of watercolor courses. The first one, Let’s Make Art, approached watercolor as a fun thing, something to not guilt over. The “kits” contain everything you need to create a complete watercolor, and Sarah Cray, the artist, does a YouTube tutorial, and also a live paint along session for each weekly painting. There is a Facebook group for community support by other budding artists, and a lot of positive feedback. The second course I enrolled in is taught by artist Anna Mason, who specializes in botanical painting that is photo realistic. You can see one of her YouTube videos here: https://youtu.be/AkxB4p-S27o . I also followed all three artists on YouTube, in order to see anything they post that might help me learn more about such a challenging medium.

I decided that painting once a month wasn’t going to cut it for learning a new skill, so I try to set aside time every day to spend painting. I try to follow the lessons, but I also take time to paint on my own, because I feel it is important to feeling more well rounded in what I learn.

So, here I am, 4 years later, still trying out new things, still loving art, and realizing that as long as I enjoy what I do, it doesn’t really matter what anyone else thinks. If art wasn’t fun, and I wasn’t able to immerse myself totally in it, I would just walk away from it all. I hope that by sharing this with anyone who reads this, it might help them get a foot in if they want to paint but have hesitated to do it.

Enjoy whatever you do, life is too short to worry about perfection.


Monday, June 15, 2015

the times... they are a changin'...again

Things are changing here.  After a long time of thinking about this website, I decided it was time to revamp. I like sharing ideas and things that are handmade. I wanted to start posting here again, but I didn't want to work in a vacuum. I decided the best way to do that would be to drag my favorite sisters into the void with me. Their first reaction was SURE!!! Then the middle sister said she doesn't have any ideas. I snorted in disgust at that, even though she couldn't hear the snort in my text message. So we have our thinking caps on, and will be posting some things soon. If you have any suggestions for things you would like to try (jello carving, paper cup sculpture, egg wrap origami, etc.) just add it to the comments section below, and we will give it a go.

Stay tuned...

...life is good, when you have sisters... cathy
i am @jonesbabie on twitter

debbie.......cathy.......vicky


Friday, January 24, 2014

say it in a card

It's been a long while since I have posted anything.  My sister and I have had several life changes, including closing the doors of our business because family obligations required more time and we could not devote enough to our clients and "artists".  I say we, but my sister has been the heart and hands of this endeavor, with some minor creative input from me.

Although we have moved on, one thing hasn't changed.  Our love of art.  Vix has continued to paint, and joined a local group of friends who meet regularly to share the joy of painting.  The one thing Vix carried away from our business was a new love of and confidence in her ability to paint, to create something using her eyes and hands (and her heart) that she could enjoy and get satisfaction from.

As for me, I am still my eclectic self.  I have been putting paint on just about every surface imaginable since I was a small child.  Everywhere I look, I see potential art.  Nothing is more fun for me than to start with an idea and see it through to fruition.  My post today is no exception.

The card you see here started out as a gag gift for a friend at work.  She had a birthday right after Christmas, and like so many post Christmas babies, she got lost in the shuffle.  She reminded us all forlornly that we had forgotten her birthday two years in a row.

So I started brainstorming and came up with this manic little version of a birthday card.  The card is made of watercolor paper heavy enough to be suitable for mixed media.  I used a light watercolor wash, then added pink polka dots, and an origami elephant.  The saying that an elephant never forgets was going through my head when I folded him, and so with a little more thought it wasn't much of a stretch to come up with a sign for him to carry, which I glued to his trunk using a dab of hot glue.  I completed the inside of the card, then decided to add an origami heart made out of a $10 bill, and never one to under-do anything, added a photo of the birthday girl taped just inside the heart.

On the inside of the card, in order to include everyone, I took some photos I had used for my Christmas card at work and put them behind a bunch of balloons, and painted and cut out a cupcake and hot glued it to the bottom of the inside page of the card.  I had also done a water color wash on the background.  I added lettering with a Pitt Pen I love, got everyone to sign it and voila!  the birthday girl had her card.  Or rather, she will, when I give it to her today. :)

My best advice to anyone who loves to create is Just Do It!  And have fun doing it, because that is what it is all about!

...life is good. ~cath 


Saturday, November 24, 2012

hats off to you!

This is the time of year when we tend to do more things indoors because of winter temperatures and weather. I decided to work on something for summer, to bolster my mood and to get a jump start on creating some things that could be enjoyed when the weather is nicer and we head outdoors to sun and fun again.

I was inspired by a book I had downloaded called The Sketchbook Challenge by Sue Bleiweiss that got my creative juices flowing, and decided I was going to paint a hat.

I have a cotton sunhat, and it has two sides. One side is turquoise, my favorite color, and the other is white. We all know that white is a great color for summer, but it is also the hardest color to keep clean, especially on a hat. So I decided I would decorate the white side, and also create something that would show a little less soil.

Materials I used:
acrylic paint in bright colors
Pitt Pens in black ink size S and F
round brushes in size 4 and 6
liner brush in size 1

I started out by just freehand sketching some simple flowers on the hat, because I know me.  If I didn't sketch them in first it would end up looking like someone had vomited flowers all over the hat, and I wanted to have a bit of control.


After sketching the flowers in, I started painting in the flowers, using one of the round paintbrushes.  I kept adding flowers to it until I had them painted in.  Then I took the green Sharpie paint pen and added vines.
After that I added the leaves in with a small round brush.


After all the painting was completed, I took the Pitt Pen in size F and outlined the flowers and the vines and leaves.


That was all there was to it.  It was a lot of fun to paint, and easy to do.  Even though the paint and pens are waterproof, I don't think I am going to test it by washing the hat.  I figure it can be worn until it looks ratty, then it is time to buy a new $5 hat and start painting again!


Have fun and remember every day is a good day when you paint!

 we Tweet @TreasuresBy_You

Monday, October 29, 2012

happy birthday bob ross!

Bob Ross believed...every day is a good day when you paint, and that it would bring a lot of good thoughts to your heart.  He brought the joy of painting to many people over the years.  Bob is gone now, but his ideas and beliefs, and his love of painting lives on forever.

Happy 70th Birthday Bob!  Where ever you are, I am sure you have a canvas and paintbrush with you...painting happy little clouds and trees.


Saturday, June 16, 2012

a shoebox by any other name...

Wow, it's been a while since I posted.  Sometimes life is a whirlwind though, and you have to deal with the whirlwind don't you?  Life is more manageable now, and I decided it's time to get this show on the road.  And since I have painted on just about everything, I decided to do some recycling today.  And turn trash into a treasure.

Who hates to throw away a shoebox?  Especially those nice sturdy boxes with hinged lids...aren't those just the coolest things?  I have been collecting photos for years, and learned many years ago that shoeboxes make excellent storage for photos.  No need to go looking for acid free boxes.  Shoeboxes fit the bill.  And they are just garbage once you wear the shoes.  (Because I never put shoes back in the original box after the shoes are on my feet.)  So there I am, all these boxes, and I start throwing photos in them, for safekeeping, with the intention someday of organizing said photos.  (Personally, I think it is way more fun to pull photos out of a shoebox and pass them around when someone's visiting, than have them pasted into a fancy schmancy photo book.  Now all of you with fancy photo books, please don't crucify me.  It is just my opinion, after all.)

I used this for my design idea
greens, orange
reds, yellow, and white

After mulling the idea through my head for several weeks, I got started.  Here are the supplies you need:1 shoeboxGesso + large flat brushAcrylic paints: warm red, cool red, warm blue, bright orange, bright green, medium yellow, and whitePaintbrushes: size 5 and 8 round, and size 4 detail brushPaper plate (I use a plastic pallette that paint will peel off of when it dries)Water
Rags
gessoed shoebox
lightly sketch the outline of the flower
Step 1: Prime the box with one or two coats of Gesso, using the big flat brush to put it on.  Let it dry between coats, and then dry overnight for good measure.  I let mine dry for days.  You can plot your design while it does.  Or use the one I used.  It's YOUR treasure after all.

Step 2:  I painted the bottom first.  The main reason I did was because if I goofed it up, it wouldn't be as noticeable.  (I've had some epic fails in projects over the years.  It's always nice when you can hide a failure.)
paint greens in background first
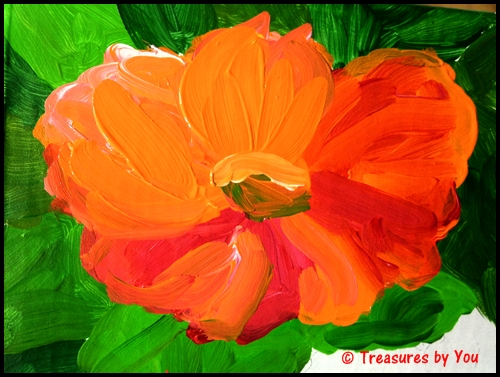
add the flowers and blend colors
red and orange petal
layer a pink petal on top
layer more petals, and blend

I kept adding petals, and blending colors until I was pleased with how they looked.


When I finished the flowers and background, I decided they needed to be outlined.  I mixed green and orange to get a dark brown. 


I kept outlining, skipping around.  I didn't want it to look like the outlines in a coloring book.  What I ended up with was sort of a bold Van Gogh type look.  It reminded me of his later paintings, bold colors and heavy outlines in broad strokes of color.

I was happy with the way the bottom turned out, so I went on to paint the rest of the box.  I let it dry before I painted the lid edges.  (If the top had been separate, this would not have been a concern.  But I didn't want the paint rubbing off the top edge of the box bottom because the lid was rubbing it.)
 After I painted it, I outlined it.  Then waited for it to dry.


 And this is how my photo box looked when I got it finished and placed the photos in it.  Pretty cute, huh?


I think I will make more of these boxes, and might even be giving some as gifts.  They make a great place to store photos, or anything at all really.  It's a way of making a nice looking storage box, with my "style" stamped on it.  I have more ideas for these little boxes just jumping around in my head.    

What do you think?  Give this a try and let me know how your "treasure" turns out!

~cath
follow us on Twitter @TreasuresBy_You


Treasures by You
Let's Paint!


Wednesday, January 4, 2012

doodling

I follow a blog called The Sketchbook Challenge and love the encouragement and sense of community I see there.  This week, they posted a prompt called "doodling" which is a way to loosen up and practice art without getting all uptight and frenzied about the outcome.  The goal is just to doodle, set aside a few minutes and just let your fingers go.

I have a small art journal, and some pigment pens of different sizes, and sat while watching television the other night and just doodled.  These are the results, and I had fun and relaxed with it.  It also gets the ideas flowing in my head.  I encourage you all to give it a try.  You don't have to have a special art journal or pens, anything works.  Try it and let me know how it goes...
And yes, anyone can doodle, just like anyone can paint...honestly.  :D


Have fun!