Showing posts with label art. Show all posts

Monday, June 15, 2015

the times... they are a changin'...again

Things are changing here.  After a long time of thinking about this website, I decided it was time to revamp. I like sharing ideas and things that are handmade. I wanted to start posting here again, but I didn't want to work in a vacuum. I decided the best way to do that would be to drag my favorite sisters into the void with me. Their first reaction was SURE!!! Then the middle sister said she doesn't have any ideas. I snorted in disgust at that, even though she couldn't hear the snort in my text message. So we have our thinking caps on, and will be posting some things soon. If you have any suggestions for things you would like to try (jello carving, paper cup sculpture, egg wrap origami, etc.) just add it to the comments section below, and we will give it a go.

Stay tuned...

...life is good, when you have sisters... cathy
i am @jonesbabie on twitter

debbie.......cathy.......vicky


Friday, January 24, 2014

say it in a card

It's been a long while since I have posted anything.  My sister and I have had several life changes, including closing the doors of our business because family obligations required more time and we could not devote enough to our clients and "artists".  I say we, but my sister has been the heart and hands of this endeavor, with some minor creative input from me.

Although we have moved on, one thing hasn't changed.  Our love of art.  Vix has continued to paint, and joined a local group of friends who meet regularly to share the joy of painting.  The one thing Vix carried away from our business was a new love of and confidence in her ability to paint, to create something using her eyes and hands (and her heart) that she could enjoy and get satisfaction from.

As for me, I am still my eclectic self.  I have been putting paint on just about every surface imaginable since I was a small child.  Everywhere I look, I see potential art.  Nothing is more fun for me than to start with an idea and see it through to fruition.  My post today is no exception.

The card you see here started out as a gag gift for a friend at work.  She had a birthday right after Christmas, and like so many post Christmas babies, she got lost in the shuffle.  She reminded us all forlornly that we had forgotten her birthday two years in a row.

So I started brainstorming and came up with this manic little version of a birthday card.  The card is made of watercolor paper heavy enough to be suitable for mixed media.  I used a light watercolor wash, then added pink polka dots, and an origami elephant.  The saying that an elephant never forgets was going through my head when I folded him, and so with a little more thought it wasn't much of a stretch to come up with a sign for him to carry, which I glued to his trunk using a dab of hot glue.  I completed the inside of the card, then decided to add an origami heart made out of a $10 bill, and never one to under-do anything, added a photo of the birthday girl taped just inside the heart.

On the inside of the card, in order to include everyone, I took some photos I had used for my Christmas card at work and put them behind a bunch of balloons, and painted and cut out a cupcake and hot glued it to the bottom of the inside page of the card.  I had also done a water color wash on the background.  I added lettering with a Pitt Pen I love, got everyone to sign it and voila!  the birthday girl had her card.  Or rather, she will, when I give it to her today. :)

My best advice to anyone who loves to create is Just Do It!  And have fun doing it, because that is what it is all about!

...life is good. ~cath 


Saturday, June 16, 2012

a shoebox by any other name...

Wow, it's been a while since I posted.  Sometimes life is a whirlwind though, and you have to deal with the whirlwind don't you?  Life is more manageable now, and I decided it's time to get this show on the road.  And since I have painted on just about everything, I decided to do some recycling today.  And turn trash into a treasure.

Who hates to throw away a shoebox?  Especially those nice sturdy boxes with hinged lids...aren't those just the coolest things?  I have been collecting photos for years, and learned many years ago that shoeboxes make excellent storage for photos.  No need to go looking for acid free boxes.  Shoeboxes fit the bill.  And they are just garbage once you wear the shoes.  (Because I never put shoes back in the original box after the shoes are on my feet.)  So there I am, all these boxes, and I start throwing photos in them, for safekeeping, with the intention someday of organizing said photos.  (Personally, I think it is way more fun to pull photos out of a shoebox and pass them around when someone's visiting, than have them pasted into a fancy schmancy photo book.  Now all of you with fancy photo books, please don't crucify me.  It is just my opinion, after all.)

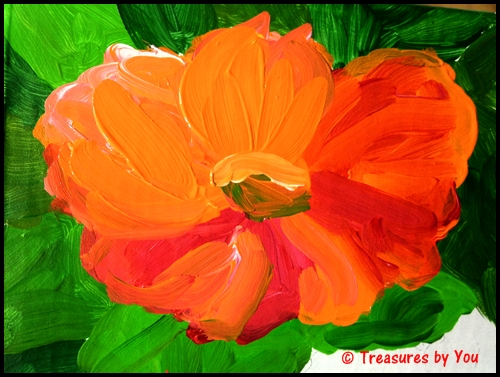
I used this for my design idea
greens, orange
reds, yellow, and white

After mulling the idea through my head for several weeks, I got started.  Here are the supplies you need:1 shoeboxGesso + large flat brushAcrylic paints: warm red, cool red, warm blue, bright orange, bright green, medium yellow, and whitePaintbrushes: size 5 and 8 round, and size 4 detail brushPaper plate (I use a plastic pallette that paint will peel off of when it dries)Water
Rags
gessoed shoebox
lightly sketch the outline of the flower
Step 1: Prime the box with one or two coats of Gesso, using the big flat brush to put it on.  Let it dry between coats, and then dry overnight for good measure.  I let mine dry for days.  You can plot your design while it does.  Or use the one I used.  It's YOUR treasure after all.


Step 2:  I painted the bottom first.  The main reason I did was because if I goofed it up, it wouldn't be as noticeable.  (I've had some epic fails in projects over the years.  It's always nice when you can hide a failure.)
paint greens in background first
add the flowers and blend colors
red and orange petal
layer a pink petal on top
layer more petals, and blend

I kept adding petals, and blending colors until I was pleased with how they looked.


When I finished the flowers and background, I decided they needed to be outlined.  I mixed green and orange to get a dark brown. 


I kept outlining, skipping around.  I didn't want it to look like the outlines in a coloring book.  What I ended up with was sort of a bold Van Gogh type look.  It reminded me of his later paintings, bold colors and heavy outlines in broad strokes of color.

I was happy with the way the bottom turned out, so I went on to paint the rest of the box.  I let it dry before I painted the lid edges.  (If the top had been separate, this would not have been a concern.  But I didn't want the paint rubbing off the top edge of the box bottom because the lid was rubbing it.)
 After I painted it, I outlined it.  Then waited for it to dry.


 And this is how my photo box looked when I got it finished and placed the photos in it.  Pretty cute, huh?


I think I will make more of these boxes, and might even be giving some as gifts.  They make a great place to store photos, or anything at all really.  It's a way of making a nice looking storage box, with my "style" stamped on it.  I have more ideas for these little boxes just jumping around in my head.    

What do you think?  Give this a try and let me know how your "treasure" turns out!

~cath
follow us on Twitter @TreasuresBy_You


Treasures by You
Let's Paint!


Sunday, January 1, 2012

a cardinal in winter

Last month as I was trying to think about what to paint for January classes, I thought about the grayness of winter, and how drab it can be for those of us who love color.  What could I paint that would convey that?  I started looking through my photos and came upon this photo...

This was the little bit of color up close.  Doesn't that just draw your eye right in and distract you from all that gray drabness?  It did for me too.  I decided it would be a perfect way to celebrate the beginning of a new year.  Red is a symbol of luck for the Chinese, and this little fellow was about as red as they come.

I set up the Bloggie camera I purchased just to film the videos I post, and painted my version of a cardinal in winter to post.  Bob Rossi is in no danger of losing his throne as the king of the television art teachers, as you will see.  If you take the time to watch it, I think you will see that painting is fun, and interpretation of any subject will vary from artist to artist.  Don't fear the paint and canvas, they are your friends. :D  Join me as I try to take the mystery out of painting, and show you how easy it is to have fun.

And if you want some one on one attention in a relaxed atmosphere, then visit the Treasures by You website and make reservations to paint.  Be sure to bring friends and some wine or other beverage to sip...there is no better way to have fun than with friends.  I guarantee it.

I broke this up into two parts so you could have an intermission, coffee, or whatever.  Vix and I hope you all have a wonderful new year and take some time for you, grab a paintbrush, and Let's Paint!

You can follow us on Facebook and Twitter...join us as we explore the world of painting and art...
~cath xo