

In the south, if something is slippery, hard to hold or stand on, we say it is slick as glass. Today I decided to try my hand at painting on glass. And I learned just exactly how slick glass is.
I bought a test kit, one of those do it yourself starter kits, because the one thing I have learned when testing new paint is: DON'T WASTE MONEY ON SOMETHING YOU MIGHT NOT USE. I say that with emphasis because I have wasted lots of money over the years on art supplies I didn't use. So my advice to anyone who wants to try a new medium to paint in, buy a kit first.
After I bought the kit, I chunked the cheap brushes in the kit to the side for the kids to paint with. That is something else I learned: buy good brushes. By good I don't necessarily mean expensive. When I buy brushes, I buy them in the store, with my hand on them to see how they look and feel. Personally, I don't like bristle brushes of any kind. I prefer sable for water color, enamel, and oil painting, and I like the acrylic taklon type brushes for acrylic paints, and they also work for just about any other paint I use. I shoot for medium price range, and look at the ferrule (that shiny metal thing that holds the bristles to the handle) to make sure it is constructed well.
 Ok, so enough of the advice. Now how does it feel to paint on glass? SLICK. As in it slides off the glass if you stroke too much or too hard. I learned quickly it is all about loading your brush with paint. Not too much and not too little. Too much and you leave a glob of paint. Too little and it is transparent. That doesn't mean mine turned out perfect...there are spots you will see where there is a bit of a ridge in the paint, or it is a bit transparent. But the overall effect was achieved I think, and it was fun doing it.
  I liked the feel of the paint gliding onto the glass, after I made a few strokes. I painted on a cheap glass container I bought when I bought the kit, and I also painted on a glass I had gotten at one of my favorite Alabama wineries on one of our tasting trips around the state. The paint dries quickly, and you have to paint one whole flower at the same time, or it gets sticky and does funky stuff. If you want to lay one color on top of another color, you have to let the first layer dry. You don't have to paint FAST, you just have to plan what you are going to paint before you start putting the paint on, or is gets a bit tricky. After about 3 flowers, I kind of had the hang of it. I put the stems and leaves on first, and then added the blossoms.
 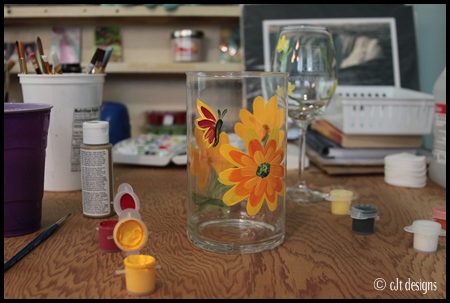 You can mix colors, but mix small amounts, because again, it dries fast. You can add water but be cautious because too much and the paint is too thin. This is how I feel about adding anything to a paint like this that has a certain viscosity: when you add water, you break down the chemical make up of the original paint, which means it might not have the "strength" to stand up to even mild wear and tear. Stick with the paint in its original form. Just because a paint says "water-based" doesn't mean it loves being thinned with water.
  The directions say to let it air dry before using for about 19 days or so. Or fire it in a low temp oven, and because I am the patient, perfectionist type, I am going to fire those babies just to see if they break. That is one of the fun things about learning a new technique. I get to break stuff or destroy it and not feel guilty, because I am learning. It gives me a certain sense of freedom. So I wait for the paint to dry a day, then in the oven they go.
 If they turn out, you won't hear anything else from me. Because I will be drinking my wine from my new, decorated wineglass.
If you see me drinking from a Dixie cup, don't ask. Just don't ask.
Have fun and Let's Paint!
~cath xo
