For me, painting a beach is the next best thing to being there. Sounds crazy? Maybe. But as I paint, I picture the place I am painting in my mind. It helps me to create, yes, but it also evokes an emotion. And all this together is a way to relax. I never get so wound up in the technical aspects of painting that I lose that image.
You will find, as you paint, and paint, and paint some more, that you will become comfortable with mixing paint, and what sizes and types of brushes to use, what size to make the painting, and so on.
Once you reach that point, begin to try to keep a mental image of what you are painting. Close your eyes and think about it.
For me, I could hear the waves rolling into the beach. I heard the cacophony of the gulls overhead. The wind was blowing the clouds by, and rustling the leaves of the palm tree I was sitting under. And the sun was blazing down on the sand, warming it under my feet. I could smell the salt air, and a total feeling of peace and quiet took over my mind.
And I put all those thoughts into the brush that laid the paint down.
Landscapes are so...therapeutic. Hope you have a chance to lay on a beach like broccoli this summer. I plan to.....with a good book and a margarita in hand.
Have fun! Enjoy the hazy, lazy, crazy days of summer.
Too soon, they come to an end.....

sharing the fun stuff
Wednesday, June 15, 2011

Saturday, June 11, 2011
flamingo road repaved
We teach our budding artists at the studio that there is more than one way to skin a cat. Or more specifically, one painting can be interpreted thousands of different ways. This is because we are each unique humans with our own way of seeing and being. No two paintings will ever be completely alike. This is the fun of painting. The surprise of the creation.
My last post was of a flamingo, gorgeously photographed and posted on JP Brandano's Photography blog. (You can find his blog here.)
As I read the comments on the first post, I saw that Eileen from Ferocious Introvert had mentioned the red in the painting made her swoon, and that she liked the description of the steps to create the flamingo, and what I used. I thought about that comment for a while. Swoon? Did that mean she doesn't like red? There was too much red? It was too intense? I was really kind of confused. But after I chewed on it for a while, I decided two things:
1. I am always going to use Big Girl to photograph my paintings for this blog. Mainly because using artsy photo apps on my iPhone may look snazzy, but it changes the colors in the painting from what they truly are. What I end up with is an artsy photo of an artsy looking painting. Too much artsy fartsy.
2. I wanted to do the flamingo in different colors. To see what would happen with the feel of it.
So, this morning, I grabbed my paintbrush and Big Girl and started painting and shooting. And what you see below is the result. I hang my extra paintings, or paintings I like, at work in my office. They are ice breakers with my mental health clients, and they turn a drab office into a room awash in stimulating color.
So thanks for your photograph Jim, x2. I love that photo! And thanks for making me stop and think Eileen, and go in a bit of a different direction. Every day is a day to learn something new!
~cath xo
 |
| my palette, cool colors this time |
 |
| outlining the design (an oops on the beak!) :D |
 |
| filling in the leaves |
 |
| close up of Brandano Flamingo |
 |
| closeup of leaves, using dabs and swirls of green, yellow and red (yes, red!) |
 |
| about halfway finished |
 |
| pinks and whites of the flamingo plumage |
 |
| closeup of flamingo |
 |
| closeup of finished flamingo in pinks |
 |
| voila! |
Sunday, June 5, 2011
flamingo road
As an artist, sometimes the best ideas come when you least expect them...and for me ideas often happen when I am poking around on the internet.
That's right. I get ideas by looking at and reading the ideas of others. When I paint, I often paint from a photo. I am not a "plein air" sort of painter...I have to have time to think about what I am painting, how I want to change and adapt it to my style. Everyone has a style. I used to think that my style was having no style, but I realize now, after years of painting, that what we see with our eyes comes through our fingertips to the media we are using, via our brain, and we all have unique one-of-a-kindness when it comes to the old noggin.
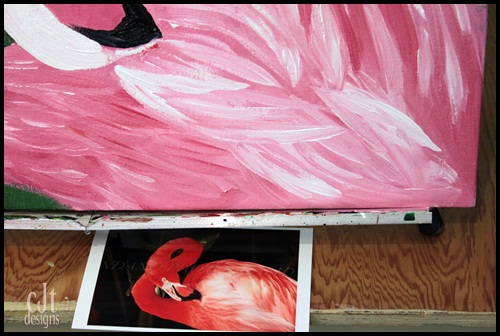
A week or so ago I was reading blogs. I follow many really good blogs, and many of those are photographers and artists (where to better get inspiration than from other artists?). So as I am reading one blog and scrolling through some gorgeous photos, BAM! I see it...a photo of a flamingo that is so bright and perfect it jumps right off the monitor and zaps me between the eyes. This particular flamingo belongs to Jim Brandano. His blog is JP Brandano: Florida's Photographers and you can see the flamingo that set my creative fires alight by clicking here.
 I messaged Jim on Facebook to ask him if it would be ok to use a photo of the flamingo to paint as a sample for the studio's classes next month, and he very kindly agreed.
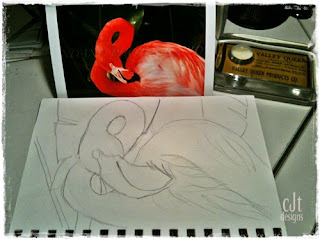
I started with a watercolor sketch of the flamingo. I do a lot of paintings in watercolor first, to get the feel of the subject, and to see how long it will take to paint. Because our classes are 3 hours long, it has to be simple in subject, and easy enough that anyone can paint. I sketch in the main parts with a pencil (that isn't cheating, it's called blocking in).
 With most paintings, we tell the class to start with the background first. With watercolor, I did just the opposite. I filled in the foreground first and then added the background. I used a dry brush technique (this means the paper is dry) because I didn't want bleeding to occur with the paint. (If I wanted to blend an area, I dampen that area.) I worked it up in shades, adding color and blending, then working on the background.
 After I was happy with the way it looked, I decided it needed outlining in black for detail. I used my Pitt Pens for that.
I thought I was finished with the watercolor at this point, but I looked at it a couple days then decided to get some acrylic paint and goober it up a little more. (That's a real artsy fartsy term, but that was what I was afraid I would end up doing...but since I wasn't satisfied with it, there was no way to go but forward...GUNG HO!)
Here I go with the white acrylic paint...just jumpin' in with both feet. (That's my worktable...not real fancy or neat, but very user friendly.)

Finally I am SO done with it and ready to move on. To canvas and acrylic paint.
The next steps pretty well speak for themselves so at this point I will shut up and let you look...if you have any comments or questions, please feel free. I live to try to explain how my brain works with an idea.


 Hope this gives you a better idea of where to go for ideas. Basically, that would be whatever is in front of your eyeballs, and makes your fingers itch to take up paintbrush and lay paint to canvas (or paper). Give it a whirl...it's fun to step outside that box and try something different.
For me? Outside the box is trying to tame Big Girl into submission so I can capture the moments of my life, then paint them. She's an ornery girl...but so am I. :D
Thanks again to Jim Brandano of JP Brandano Photography for inspiring me this month. Check out his blog for some wonderful photographs and great tips on photography!
That's right. I get ideas by looking at and reading the ideas of others. When I paint, I often paint from a photo. I am not a "plein air" sort of painter...I have to have time to think about what I am painting, how I want to change and adapt it to my style. Everyone has a style. I used to think that my style was having no style, but I realize now, after years of painting, that what we see with our eyes comes through our fingertips to the media we are using, via our brain, and we all have unique one-of-a-kindness when it comes to the old noggin.
A week or so ago I was reading blogs. I follow many really good blogs, and many of those are photographers and artists (where to better get inspiration than from other artists?). So as I am reading one blog and scrolling through some gorgeous photos, BAM! I see it...a photo of a flamingo that is so bright and perfect it jumps right off the monitor and zaps me between the eyes. This particular flamingo belongs to Jim Brandano. His blog is JP Brandano: Florida's Photographers and you can see the flamingo that set my creative fires alight by clicking here.
 I messaged Jim on Facebook to ask him if it would be ok to use a photo of the flamingo to paint as a sample for the studio's classes next month, and he very kindly agreed.
I started with a watercolor sketch of the flamingo. I do a lot of paintings in watercolor first, to get the feel of the subject, and to see how long it will take to paint. Because our classes are 3 hours long, it has to be simple in subject, and easy enough that anyone can paint. I sketch in the main parts with a pencil (that isn't cheating, it's called blocking in).

 After I was happy with the way it looked, I decided it needed outlining in black for detail. I used my Pitt Pens for that.
I thought I was finished with the watercolor at this point, but I looked at it a couple days then decided to get some acrylic paint and goober it up a little more. (That's a real artsy fartsy term, but that was what I was afraid I would end up doing...but since I wasn't satisfied with it, there was no way to go but forward...GUNG HO!)

Here I go with the white acrylic paint...just jumpin' in with both feet. (That's my worktable...not real fancy or neat, but very user friendly.)

Finally I am SO done with it and ready to move on. To canvas and acrylic paint.
The next steps pretty well speak for themselves so at this point I will shut up and let you look...if you have any comments or questions, please feel free. I live to try to explain how my brain works with an idea.


 Hope this gives you a better idea of where to go for ideas. Basically, that would be whatever is in front of your eyeballs, and makes your fingers itch to take up paintbrush and lay paint to canvas (or paper). Give it a whirl...it's fun to step outside that box and try something different.
For me? Outside the box is trying to tame Big Girl into submission so I can capture the moments of my life, then paint them. She's an ornery girl...but so am I. :D
 |
| photo taken by Big Girl :D |
Thanks again to Jim Brandano of JP Brandano Photography for inspiring me this month. Check out his blog for some wonderful photographs and great tips on photography!
Subscribe to:
Comments (Atom)