
Today I am working on a painting for the studio's March calendar, and I decided it would make a good follow-along painting. So many people read the post "you can call me bob" and seemed to enjoy it that I decided to do a step by step once in a while to let you see the process for other paintings. Each painting I paint uses different brush strokes and techniques for achieving the end result (art I can hang).
The painting today is Purple Petunias by Georgia O'Keeffe, one of the American Masters who had great influence on the art world, and especially Europe, until her death at the age of 98. I admire O'Keeffe because she was influential, talented, and stood out in a world of art dominated mostly by men.
 Our palette today is light magenta, dioxazine purple, phthalocyanine blue, white and black. I had another purple laid out too, but decided it had too red a tone to it. The predominant colors are a blue purple and pink. White and black are used to change the tones, add highlights, and shadows. I used a 1 inch flat wash for the entire painting. You might want to use a 1 inch wash for broad areas, and a 1/2 inch wash for details. I used a size 8 round for the flower centers.
 First I started with some thinned purple to make the main outlines with. You can use pencil to draw on the canvas too, but I don't recommend it because it is sometimes harder to cover pencil than another color of paint with acrylics, especially if you use thin body acrylics to paint with like we use for classes at the studio. The lines are not to provide fill in the blank areas (that wouldn't be painting like a master now, would it?) but are meant to be general landmarks, or guidelines to keep the perspective correct.
 Next I mixed some white with a small amount of black to make gray and painted the top and side areas around the flowers. I shaded it a bit darker near the edge of the flowers. Then I began to fill in the broad areas of the flower using the purple mixed with just a little bit of white. This is the base color of the flower, what we add lighter and darker shades of color to, to provided depth and tonal quality to the painting.
 Continue to fill in the areas, using pink in broad areas and purple. This sets the stage for the next step, blending the edges and adding tone. Now if you are quick enough, you can blend the colors before the paint dries, but you'd have to be superman to be that fast. I paint fast and even I couldn't blend all the areas before the paint dried. Which meant I had to pick up more paint and blend.


Continue to blend the areas. I didn't use much paint on my brush at this point. Large amounts of paint just turned the pink to purple and the purple to lighter purple. 

It is what I call a dry brush technique. You pick up small amounts of paint on your brush and blend. If too much paint builds up, I wipe some off on the rag. I rarely rinse my brush unless I have mixed too many colors together and it begins to look muddy. The aim is to keep the colors bright, and control the blending.

 If you rinse your brush out, then be sure to press down HARD on the rag to remove as much water as possible. You want the brush to remain as dry as you can get it.
Next begin to add some white details to the edge of the petals on the flower in the forefront, and also to the bottom right edge of the blossom in back. Again, dry blend the colors.

The centers come next. Black with just a touch of purple. And from the centers I blended out the dark areas of the flowers. Dry blend...dry brush, dry brush...not too much paint...small amounts at a time and if I got too much of one color, I just wiped, picked up another color and kept blending.

*TIP: if you are nervous about blending on the canvas, buy a cheap canvas, to practice strokes and blending on. I'd tell you to practice on heavy white paper, and you can, but the feel won't be the same because paper doesn't have the same "tooth" as canvas does. You can also pick up a cheap small housepainting brush and gesso, and gesso over the practice painting so you can reuse the canvases. We do this when we begin to have too many of one painting in the studio...we pick some and gesso over them to use for practice again. Even famous artists often did this to save money on supplies.
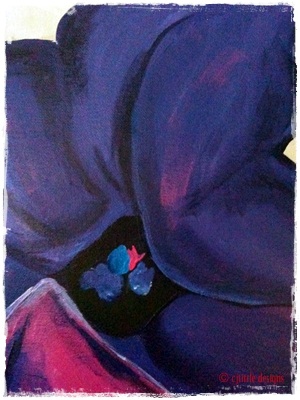


Last I add the centers of the flowers with pink, purple and blue, mixed with a bit of white....
After all the blending and edging, you have your finished painting. Only you will know when you are finished. When you reach a point that you are pleased with the outcome, STOP!!! I can't tell you how many times I have had to tell that to students who just wanted to add a 'bit more'. That bit more can muddy a painting and you can lose the effect you were aiming to achieve.
*Note: you can always add to a painting later. Sometimes it is best to stop, walk away, and let your eyes and brain rest for a while. Then when you return you will have 'fresh eyes' and probably a new perspective on what you were trying to achieve. For those who attend class in our studio, we will 'bump' you past that point, by making you take a short break, then suggesting a brush stroke or two to jump start you again.

And so you have the finished canvas...O'Keeffe is fun to paint...and here is the original I used for practice:

HAVE FUN WITH ART! See you next time!!!
No comments:
Post a Comment
We love comments!